Tuesday, September 18, 2018

How to Repair or Unlock ATMEGA64 on Xprog M

Here’s the customer solution to help users solve the problem xprog atmega64 locked and can not read or program chip issue.
This is done off board with qfp64 breakout board should be able to  program onboard xprog also though.

Disclaimer:  Many thanks dil6222 from cartechnology.co.uk forum. You are at your risk.

Easy fix all you need is:
1. UPA USB PROGRAMMER
2. USBASP WITH SLOW CLOCK JUMPER ON
EXTREME BURNER SOFTWARE AND 10 TO 6PIN ADAPTER
3. JUMPER WIRES FEMALE AND MALE
4.QFP64 BREAKOUT BOARD
let’s get started 
1.     First of all connect jumper wires between atmega and usbasp
you will need to split vcc + into 3 wires and gnd – into 3 wires
Connect vcc+ to pin 21,52 and (64 i believe optional as for avcc i test later)
Connect gnd- to pin 22,53 and 63
Connect SCK to SCK
Connect RESET to RESET
MOSI to PE0    (common problem is people using PB2 and PB3 as there listed as mosi and MISO but they are not )
MISO to PE1
You should end up with something like this .  you can see I’ve split the and vcc
unlock-xprog-ATMEGA64-1
2.   Next connect PIN2  from UPA DB9 SOCKET to XTAL 1.
Now connect everything else usbasp and upa to usb etc
unlock-xprog-ATMEGA64-2
Now comes the fun bit
3.   Open upa software go on tools then pulse generator and you will see this:
unlock-xprog-ATMEGA64-3
Change frequency to 1000khz and click start and leave it running.
unlock-xprog-ATMEGA64-4
4. Open extreme burner avr and go to fuse settings tab and click on read
atmega should connect as normal
unlock-xprog-ATMEGA64-5
5. Go on each set of fuses low, high, extended lock go on bit details and click load default value for each set
Then tick all the write boxs and click write.   or you can manually enter the following
(  Low E1,  HIGH 99, EXTENDED FD, LOCK FF then click write these are factory lockbits. see photo
unlock-xprog-ATMEGA64-6
6. Go on low fuses and check the following clksel settings are  there
Cksel0   (1)
Cksel1   (0)
Cksel2   (0)
Cksel3   (0)
unlock-xprog-ATMEGA64-7
Now erase chip and then disconnect upa
That’s it all done it should be able to program/ read as normal without upa sending signal to xtal1 on mega.
Hope this helps many users to unlock Xprog atmega 64.

Thursday, September 13, 2018

How to Read Audi A6 2005-2011 ELV MC9S12 with Xprog

Guide: Audi A6 2005-2011 ELV module (kessy) pinout to Xprog m v5.55 box programmer.

OEM= 4F0905852B
MCU= MC9S12 3L40K
Read as secured
audi-a6-elv-pinout-to-xprog-1

I have done 4pc of this unit last month.
Short cables max 12cm long.
When it don’t read always try to lift reset pin
(I have never done it but some Xprog is sensitive and then try lift reset)
Operate by following my instruction, one friend used the adapter (BDM) and wires with a length of 10 cm. RESET leg lift.
audi-a6-elv-pinout-to-xprog-2
audi-a6-elv-pinout-to-xprog-3

audi-a6-elv-pinout-to-xprog-4

audi-a6-elv-pinout-to-xprog-5

audi-a6-elv-pinout-to-xprog-6

audi-a6-elv-pinout-to-xprog-7

Sunday, September 9, 2018

How to remove BMW Airbag 240 "Internal error" with Xprog

On the example of the control unit Temic 6577-6900727, he himself MRSZ3 V. 2.5-V. 3.0.  I will show you how to remove 240 "Internal error" error. This airbag has been installed in BMW e39, е38 and е46. 

For this you need a xprog box programmer that will be able to read the data from this ECU. We just need to record new memory without errors in the Motorola MC68HC12b32 element.

See the connection point below in the picture. Next, we take a clean memory, without errors, and save it using the xprog-m programmer in the Motorola element. Next, we set the control unit back to the car and we enjoy the capable system of safety again.
xprog-fix-bmw-airbag-1
xprog-fix-bmw-airbag-2
xprog-fix-bmw-airbag-3
(Click to enlarge)

Thursday, August 23, 2018

How to read BMW Freescale MC9S12D64 with Xprog V5.60

Here's the DIY guide for those whom want to get tripple blinker on their BMW E46.


DIY:
1) you need LSZ module with =>SW3.6 on sticker
2) xprog v5.55 v5.60 or above with mc9s12 bdm adapter
3) sticked dump of ci37 (eeprom virgined, need to be coded after installing ecu to car)

wires color legend (follow xprog box connection manual for mc9s12d64):
blue - reset
red - VCC
green - BKGD
yellow - xclks
white - extal
gray - GND

ground wire instead of soldering to pcb can be ezly connected to pin 32 in connection socket.
xprog-mc9s12d64-1
xprog-mc9s12d64-2
xprog-mc9s12d64-3
xprog-mc9s12d64-4
xprog-mc9s12d64-5
xprog-mc9s12d64-6
(Click to enlarge)


Result here:
xprog-mc9s12d64-7
xprog-mc9s12d64-8

Free download: lsz_c37_xprog.zip


Credit to MeMpHiSj from MHHAUTO

Tuesday, August 14, 2018

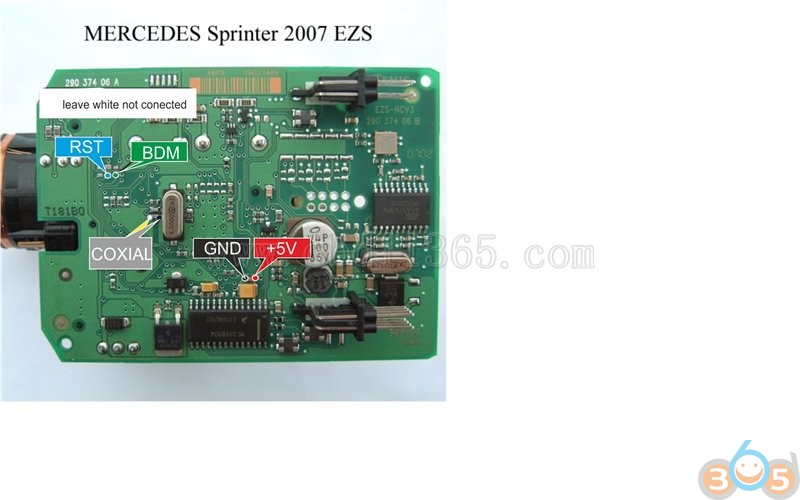
Benz Sprinter 2010 EZS Soldering Pinouts to Xprog

Purpose: 
Do odometer correction on 2010 Sprinter Van. I need the soldering points for the ezs/eis.I can't actually see the mask but after extensive reading every points to them having the 0L01Y mask. Which programmer will work?


Solution:

R260 original ok
clone rosfar,ok
xprog clone ok
R270 ok


Use xprog the pinouts for xprog is what posted below. i always do this with xprog and never had a problem just select in device options " read and verify " make sure it is NOT selected and you should be ok , use the BDM adaptor with xprog for it
here is the settings i use and you know the story always keep backup of the files you read

xprog-sprinter-ezs-1


xprog-sprinter-ezs-2


xprog-sprinter-ezs-3

BTW:


Here are R270 wires:

2- +5v

24,26- ground

7- reset

19- background

r270-sprinter-ezs-1


Tuesday, August 7, 2018

Read Volvo S40/V50/C30/C70 MCU MC9S12DG256

Read Volvo S40/V50/C30/C70 2004 MCU MC9S12DG256 80 QFP  by xprog m box ecu programmer. 

Picture and pinout attached:
xprog-volvo-mc9s12dg256-1

xprog-volvo-mc9s12dg256-2

xprog-volvo-mc9s12dg256-3

xprog-volvo-mc9s12dg256-4

xprog-volvo-mc9s12dg256-5

xprog-volvo-mc9s12dg256-6
Click to enlarge all images. 


http://www.obdii365.com/wholesale/v570-xprog-m-ecu-programmer.html

Tuesday, July 3, 2018

Xprog can unlock KVM secured & read MCU 9S12XEQ384

Test report: Xprog box running the latest software version 5.8 is able to Read MCU 9S12 XEQ 384 from a Range Rover 2015-2016.
Save P-FLASH and D-FLASH unlock KVM secured.

Now, i’ll show you the location of a KVM module
And remove the module with secured MCU9S12XEQ
Read on bench with Xprog HQ clone or original
Then will save P-FLASH and D-FLASH unlock KVM secured

Here you go.

The module location inside Range Rover 2015-2016
xprog-land-rover-kvm-mc9s12-1
xprog-land-rover-kvm-mc9s12-2
The Xprog m ecu programmer
xprog-land-rover-kvm-mc9s12-3
The KVM board
xprog-land-rover-kvm-mc9s12-4
Secured MCU 9S12 XEQ
xprog-land-rover-kvm-mc9s12-5
xprog-land-rover-kvm-mc9s12-6
xprog-land-rover-kvm-mc9s12-7
xprog-land-rover-kvm-mc9s12-8
Pin 42 and 46
Lift 1 pins shown in the photo
xprog-land-rover-kvm-mc9s12-9
xprog-land-rover-kvm-mc9s12-10
xprog-land-rover-kvm-mc9s12-11
xprog-land-rover-kvm-mc9s12-12
Maximum wires length 12cm
xprog-land-rover-kvm-mc9s12-13
Secured MCU 9S12 XEQ 384
xprog-land-rover-kvm-mc9s12-14
xprog-land-rover-kvm-mc9s12-15
MCU/MPU, Freescale NXP 9S12XE, MC9S12XEQ384 D-FLASH-Secured
xprog-land-rover-kvm-mc9s12-16
Tip & Guide: How to get Xprog to work with secured MCU:
Reset MCU security
Run->change security state->reset MCU security
Wait 10…15 seconds if not success, cancel process
Check connection
Start from a
Remember MCU security byte value
Read, write…commands can be executed many times
Set MCU security
Run->change security sate->set MCU security
Read
xprog-land-rover-kvm-mc9s12-17
xprog-land-rover-kvm-mc9s12-18
Reset MCU security
xprog-land-rover-kvm-mc9s12-19
It will take 10 to 12 seconds to unlock MCU
IP NOT STOP and repeat
xprog-land-rover-kvm-mc9s12-20
xprog-land-rover-kvm-mc9s12-21
Read
xprog-land-rover-kvm-mc9s12-22
xprog-land-rover-kvm-mc9s12-23
xprog-land-rover-kvm-mc9s12-24
xprog-land-rover-kvm-mc9s12-25
xprog-land-rover-kvm-mc9s12-26
Save data
xprog-land-rover-kvm-mc9s12-27
MCU/MPU, Freescale NXP 9S12XE, MC9S12XEQ384 P-FLASH-Secured
xprog-land-rover-kvm-mc9s12-28
Read
xprog-land-rover-kvm-mc9s12-29
xprog-land-rover-kvm-mc9s12-30
xprog-land-rover-kvm-mc9s12-31
xprog-land-rover-kvm-mc9s12-32
Save data
xprog-land-rover-kvm-mc9s12-33
Job’s done!
Now you can upload the data and generate new key file with key programmers, i.e VVDI2 v5.6.0 above or Mart Tool. Then write data back to KVM.


Related Post: